Replacement for the Vortex Racer 3
I was quite happy with the Vortex Racer 3. But, having 2 years of experience using a mechanical keyboard and understanding the options it opened up, the need to replace my clicky Racer 3 allowed me to go on the hunt for a better replacement.
I went back to the keyboard store in Sim Lim Square in Singapore to look for a replacement. And I initially decided to go with a 75% keyboard - the Multix 87 keyboard, which was also made by Vortex. I took it back home and played around with the hardware based keyboard mapping, but found it wasn’t as flexible as the previous Racer 3 that I had. Besides, that, the F6 key wasn’t working properly. So the next day, I went back to the store and decided to get a replacement.
I stumbled upon the 96% layout of the Glorious GMMK2 which did away with the dedicated navigation key section so that it only had the usual letter, number and function keys on the left and the numeric keypad on the right. That was nice, I thought, as I had that vertical enter key on the right. So, I upgraded the Multix 87 for the Glorious GMMK2 96% ANSI layout keyboard.
The Glorious GMMK2 96% keyboard
I wasn’t too thrilled with the RGB lighting, but since it could be switched off, that wasn’t an issue. The build quality of the keyboard was pretty good and solid. And the linear switches that came with it were really smooth. I just loved typing on this. I wasn’t too thrilled that the keyboard mapping software (Glorious Core) that came with it was only Windows based, but eventually, I managed to get the keyboard mapping that I needed and was generally happy.
Then, a few days after this purchase, as I was going through the specifications on this keyboard, I came across this - Firmware Compatibility: Glorious Core and QMK. And there wasn’t anything else mentioned about QMK. What was it?
QMK
Open Source Firmware? Really? Why didn’t the guy at the store tell me about this?
I read up on this a little bit more, and it looked like this was exactly what I needed:
Open Source code for the Firware
Written in C and compiled to a binary
Binay firmware would replace the firmware on the keyboard
Supports up to 32 layers with each layer allowing your own key map
Support for managing the RGB lighting as well. This I would use to make my Caps Lock and Num Lock display more prominent.
I did take me some research and a while to setup my build environment for this, but eventually I managed to do it.
Environment Setup
Reference URLS:
https://www.gloriousgaming.com/blogs/guides-resources/gmmk-2-qmk-installation-guide
https://gloriousforum.com/t/qmk-install-keymap-guide-for-gmmk-2-compact-on-ubuntu-distros/14529
QMK Setup
Pre-requisite: Python 3 and Python Virtual Environment.
The following provides the command line steps in Linux bash:
$ cd ~/p3venvchange my current folder to where all my python 3 virtual environments are stored.$ virtualenv qmkcreate a python 3 virtual environment called qmk$ source ~/p3venv/qmk/bin/activateactivate my virtual environment.$ python3 -m pip install --upgrade pipupdate pip for my python 3 virtual environment.$ pip install qmkinstall the QMK libraries.$ qmk setup GloriousThrall/qmk_firmwareI’m not exactly what this does, but it sets up the QMK environment I think.$ cd ~/qmk_firmwarechange folder in preparation to download the QMK source code.$ git checkout glorious_gmmk2check out the Glorious GMMK2 source code.$ make git-submodulethis sets up the code in preparation for compiling.
Then, we do an initial compile to verify that the environment setup is correct with
$ qmk compile -kb gmmk/gmmk2/p96/ansi -km default
This would compile the firmware for the GMMK2 96% ANSI version of the keyboard, which is what my keyboard model is.
Install the wb32-dfu-updater
Before we can download the compiled firmware to the keyboard, we need to install the correct USB driver. This is the wb32-dfu which I installed with the following commands:
$ git clone https://github.com/WestberryTech/wb32-dfu-updater.gitto download the source code for this USB driver.$ cd wb32-dfu-updaterto go into the main source code root folder.$ sudo apt install -y cmake libudev-devas the source code requires cmake and libudev-dev packages.$ sudo ./bootstrap.sh installto install the driver. During this process, select1to install libusb
Accessing the keyboard as a non-root user
Once this has been done, to allow access for the driver and the firmware update as a non-root user, we need to add some udev rules. Otherwise, we will get the following error:
Cannot open DFU device 342d:dfa0 found on devnum 10 (LIBUSB_ERROR_ACCESS)
The commands given below are executed on the bash command line:
$ sudo cp ~/qmk_firmware/util/udev/50-qmk.rules /etc/udev/rules.dto update the udev rules to the system config folder in the /etc folder.$ sudo udevadm control --reload-rules && sudo udevadm triggerto allow the new rules to take effect.
With that, we should have what it takes for the Linux USB driver for the keyboard to be ready.
Configuring your build defaults
We now setup our QMK build defaults with the following commands on the command line:
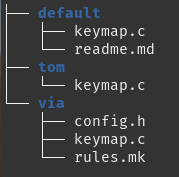
$ cd ~/qmk_firmware/keyboards/gmmk/gmmk2/p96/ansi/keymaps/as we change into the folder where the keymaps.c file is located for our GMMK2 96% ANSI keyboard.$ mkdir tomto create a folder to house my version of thekeymap.cfile.

The folder structure under the keymaps folder
$ cd tomto change into my folder$ ln -ns /home/thomas-pk/Documents/Hardware/Keyboard/Glorious\ GMMK2/keymap.c .This is to link my version of the keymap.c file situated in My Documents folder to the source code compile folder. I do this as my My Documents folder is always backed up.
My keymap.c file
This section explains the contents of my QMK keymap.c file
My keymap.c file for my Glorious GMMK2 96% ANSI keyboard is provided here for your download.
Header and definitions
47#include QMK_KEYBOARD_H
48
49// GMMK2 96 Default key group definitions
50int FUNC_KEYS[] = {0,  1,  2,  3,  4,  5,  6,  7,  8,  9, 10, 11, 12, 13,
51                  18, 18, 19, 20, 21, 22, 23, 24, 25, 26, 27, 28, 29, 30, 31,
52                  36, 37, 38, 39, 40, 41, 42, 43, 44, 45, 46, 47, 48, 49,
53                  54, 55, 56, 57, 58, 59, 60, 61, 62, 63, 64, 65, 66,
54                  70, 71, 72, 73, 74, 75, 76, 77, 78, 79, 80, 81,
55                  87, 88, 89, 90, 91, 92, 93
56};
57int NUM_KEYS[] = {32, 33, 34, 35, 50, 51, 52, 53, 67, 68, 69, 83, 84, 85, 86, 97, 98};
58
59// Initialize the size of each key group
60int SIZE_OF_FUNC_KEYS = sizeof(FUNC_KEYS)/sizeof(int);
61int SIZE_OF_NUM_KEYS = sizeof(NUM_KEYS)/sizeof(int);
The above lines for FUNC_KEYS are to define the keys to light up when my Key Cap is enabled, while the NUM_KEYS define the keys to light up when my Num Lock is enabled.
Keymap Layers
63// Each layer gets a name for readability, which is then used in the keymap matrix below.
64// The underscores don't mean anything - you can have a layer called STUFF or any other name.
65#define _BL 0
66#define _FL 1
67#define _ML 2
68
69const uint16_t PROGMEM keymaps[][MATRIX_ROWS][MATRIX_COLS] = {
70  /* Keymap _BL: Base Layer (Default Layer)
71   */
72[_BL] = LAYOUT(
73  KC_ESC,            KC_F1,    KC_F2,    KC_F3,    KC_F4,    KC_F5,    KC_F6,    KC_F7,    KC_F8,    KC_F9,    KC_F10,   KC_F11,   KC_F12,   KC_PSCR,  KC_DEL,   KC_INS,   KC_PGUP,  KC_PGDN,
74  KC_GRV,            KC_1,     KC_2,     KC_3,     KC_4,     KC_5,     KC_6,     KC_7,     KC_8,     KC_9,     KC_0,     KC_MINS,  KC_EQL,   KC_BSPC,  KC_NLCK,  KC_PSLS,  KC_PAST,  KC_PMNS,
75  LT(_ML, KC_TAB),   KC_Q,     KC_W,     KC_E,     KC_R,     KC_T,     KC_Y,     KC_U,     KC_I,     KC_O,     KC_P,     KC_LBRC,  KC_RBRC,  KC_BSLS,  KC_P7,    KC_P8,    KC_P9,    KC_PPLS,
76  LT(_FL, KC_CAPS),  KC_A,     KC_S,     KC_D,     KC_F,     KC_G,     KC_H,     KC_J,     KC_K,     KC_L,     KC_SCLN,  KC_QUOT,             KC_ENT,  KC_P4,    KC_P5,    KC_P6,
77  KC_LSFT,           KC_Z,     KC_X,     KC_C,     KC_V,     KC_B,     KC_N,     KC_M,     KC_COMM,  KC_DOT,   KC_SLSH,  KC_RSFT,  KC_UP,    KC_P1,    KC_P2,    KC_P3,    KC_PENT,
78  KC_LCTL,           KC_LGUI,  KC_LALT,                      KC_SPC,                                 KC_RALT,  MO(_FL),  KC_RCTL,  KC_LEFT,  KC_DOWN,  KC_RGHT,  KC_P0,    KC_PDOT),
79  /* Keymap _FL: Function Layer
80   */
81[_FL] = LAYOUT(
82    RESET,           KC_MYCM,  KC_WHOM,  KC_CALC,  KC_MSEL,  KC_MPRV,  KC_MRWD,  KC_MPLY,  KC_MSTP,  KC_MUTE,  KC_VOLU,  KC_VOLD,  _______,   _______,  _______,  _______,  _______,  _______,
83  _______,           RGB_HUI,  RGB_HUD,  RGB_SPD,  RGB_SPI,  _______,  RGB_TOG,  RGB_M_K,  RGB_M_X,  _______,  _______,  _______,  _______,   _______,  _______,  _______,  _______,  _______,
84  _______,         _______, LCA(KC_TAB), KC_BSPC,  _______,  _______,  _______,  KC_PGUP,  KC_HOME,  KC_END,   KC_BTN2,  _______,  _______,   _______,  _______,  _______,  _______,  _______,
85  _______,           _______,  _______,  KC_DEL,   _______,  _______,  KC_LEFT,  KC_DOWN,  KC_UP,    KC_RGHT,  _______,  _______,  _______,             _______,  _______,  _______,
86  _______,           _______,  _______,  KC_CAPS,  _______,  _______,  KC_PGDN,  KC_APP,   _______,  _______,  _______,  _______,  RGB_VAI,   _______,  _______,  _______,  _______,
87  _______,           UC_M_WI,  _______,                      _______,                                _______,  _______,  _______, RGB_RMOD,   RGB_VAD,  RGB_MOD,  _______,  _______),
88
89  /* Keymap _ML: Mouse Layer
90   */
91[_ML] = LAYOUT(
92  _______,           _______,  _______,  _______,  _______,  _______,  _______,  _______,  _______,  _______,  _______,  _______,  _______,   _______,  _______,  _______,  _______,  _______,
93  _______,           _______,  _______,  _______,  _______,  _______,  _______,  _______,  _______,  _______,  _______,  _______,  _______,   _______,  _______,  _______,  _______,  _______,
94  _______,           _______,  _______,  _______,  _______,  _______,  _______,  KC_BTN1,  _______,  KC_BTN2,  _______,  _______,  _______,   _______,  _______,  _______,  _______,  _______,
95  _______,           _______,  _______,  _______,  _______,  _______,  KC_MS_L,  KC_MS_D,  KC_MS_U,  KC_MS_R,  _______,  _______,  _______,             _______,  _______,  _______,
96  _______,           _______,  _______,  _______,  _______,  _______,  _______,  _______,  _______,  _______,  _______,  _______,  _______,   _______,  _______,  _______,  _______,
97  _______,           _______,  _______,                      _______,                                _______,  _______,  _______,  _______,   _______,  _______,  _______,  _______)
98};
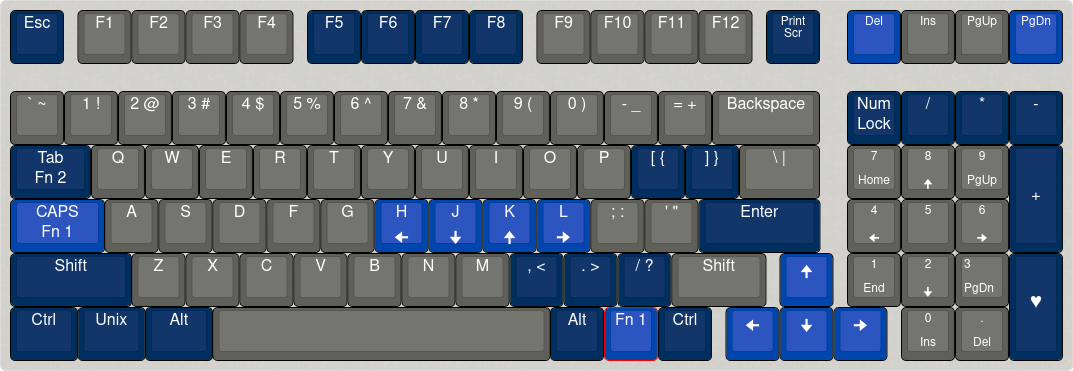
The above shows my key mapping with 3 layers defined: Base Layer, Function Layer and Mouse Layer.
Its probably easier to see this pictorially as shown below.

Pictorial represntation of some of my key mapping on the GMMK2 96% ANSI Keyboard
Key light up
100void rgb_matrix_indicators_advanced_user(uint8_t led_min, uint8_t led_max) {
101  if (IS_HOST_LED_ON(USB_LED_CAPS_LOCK)) {
102    for(int i=0; i < SIZE_OF_FUNC_KEYS; i++) {
103      RGB_MATRIX_INDICATOR_SET_COLOR(FUNC_KEYS[i], 255, 255, 255);
104    }
105  }
106  else {
107    for(int i=0; i < SIZE_OF_FUNC_KEYS; i++) {
108      RGB_MATRIX_INDICATOR_SET_COLOR(FUNC_KEYS[i], 20, 20, 20);
109    }
110  }
111
112  if (IS_HOST_LED_ON(USB_LED_NUM_LOCK)) {
113    for(int i=0; i < SIZE_OF_NUM_KEYS; i++) {
114      RGB_MATRIX_INDICATOR_SET_COLOR(NUM_KEYS[i], 255, 255, 255);
115    }
116  }
117  else {
118    for(int i=0; i < SIZE_OF_NUM_KEYS; i++) {
119      RGB_MATRIX_INDICATOR_SET_COLOR(NUM_KEYS[i], 20, 20, 20);
120    }
121  }
122}
123
124void keyboard_post_init_user(void) {
125  rgblight_enable_noeeprom();
126  rgblight_set_speed(25);
127}
The above code lights up the whole alphabet section when the Caps Lock is enabled and lights up the whole numeric key pad when the Num Lock is enabled.