The Keychron V4

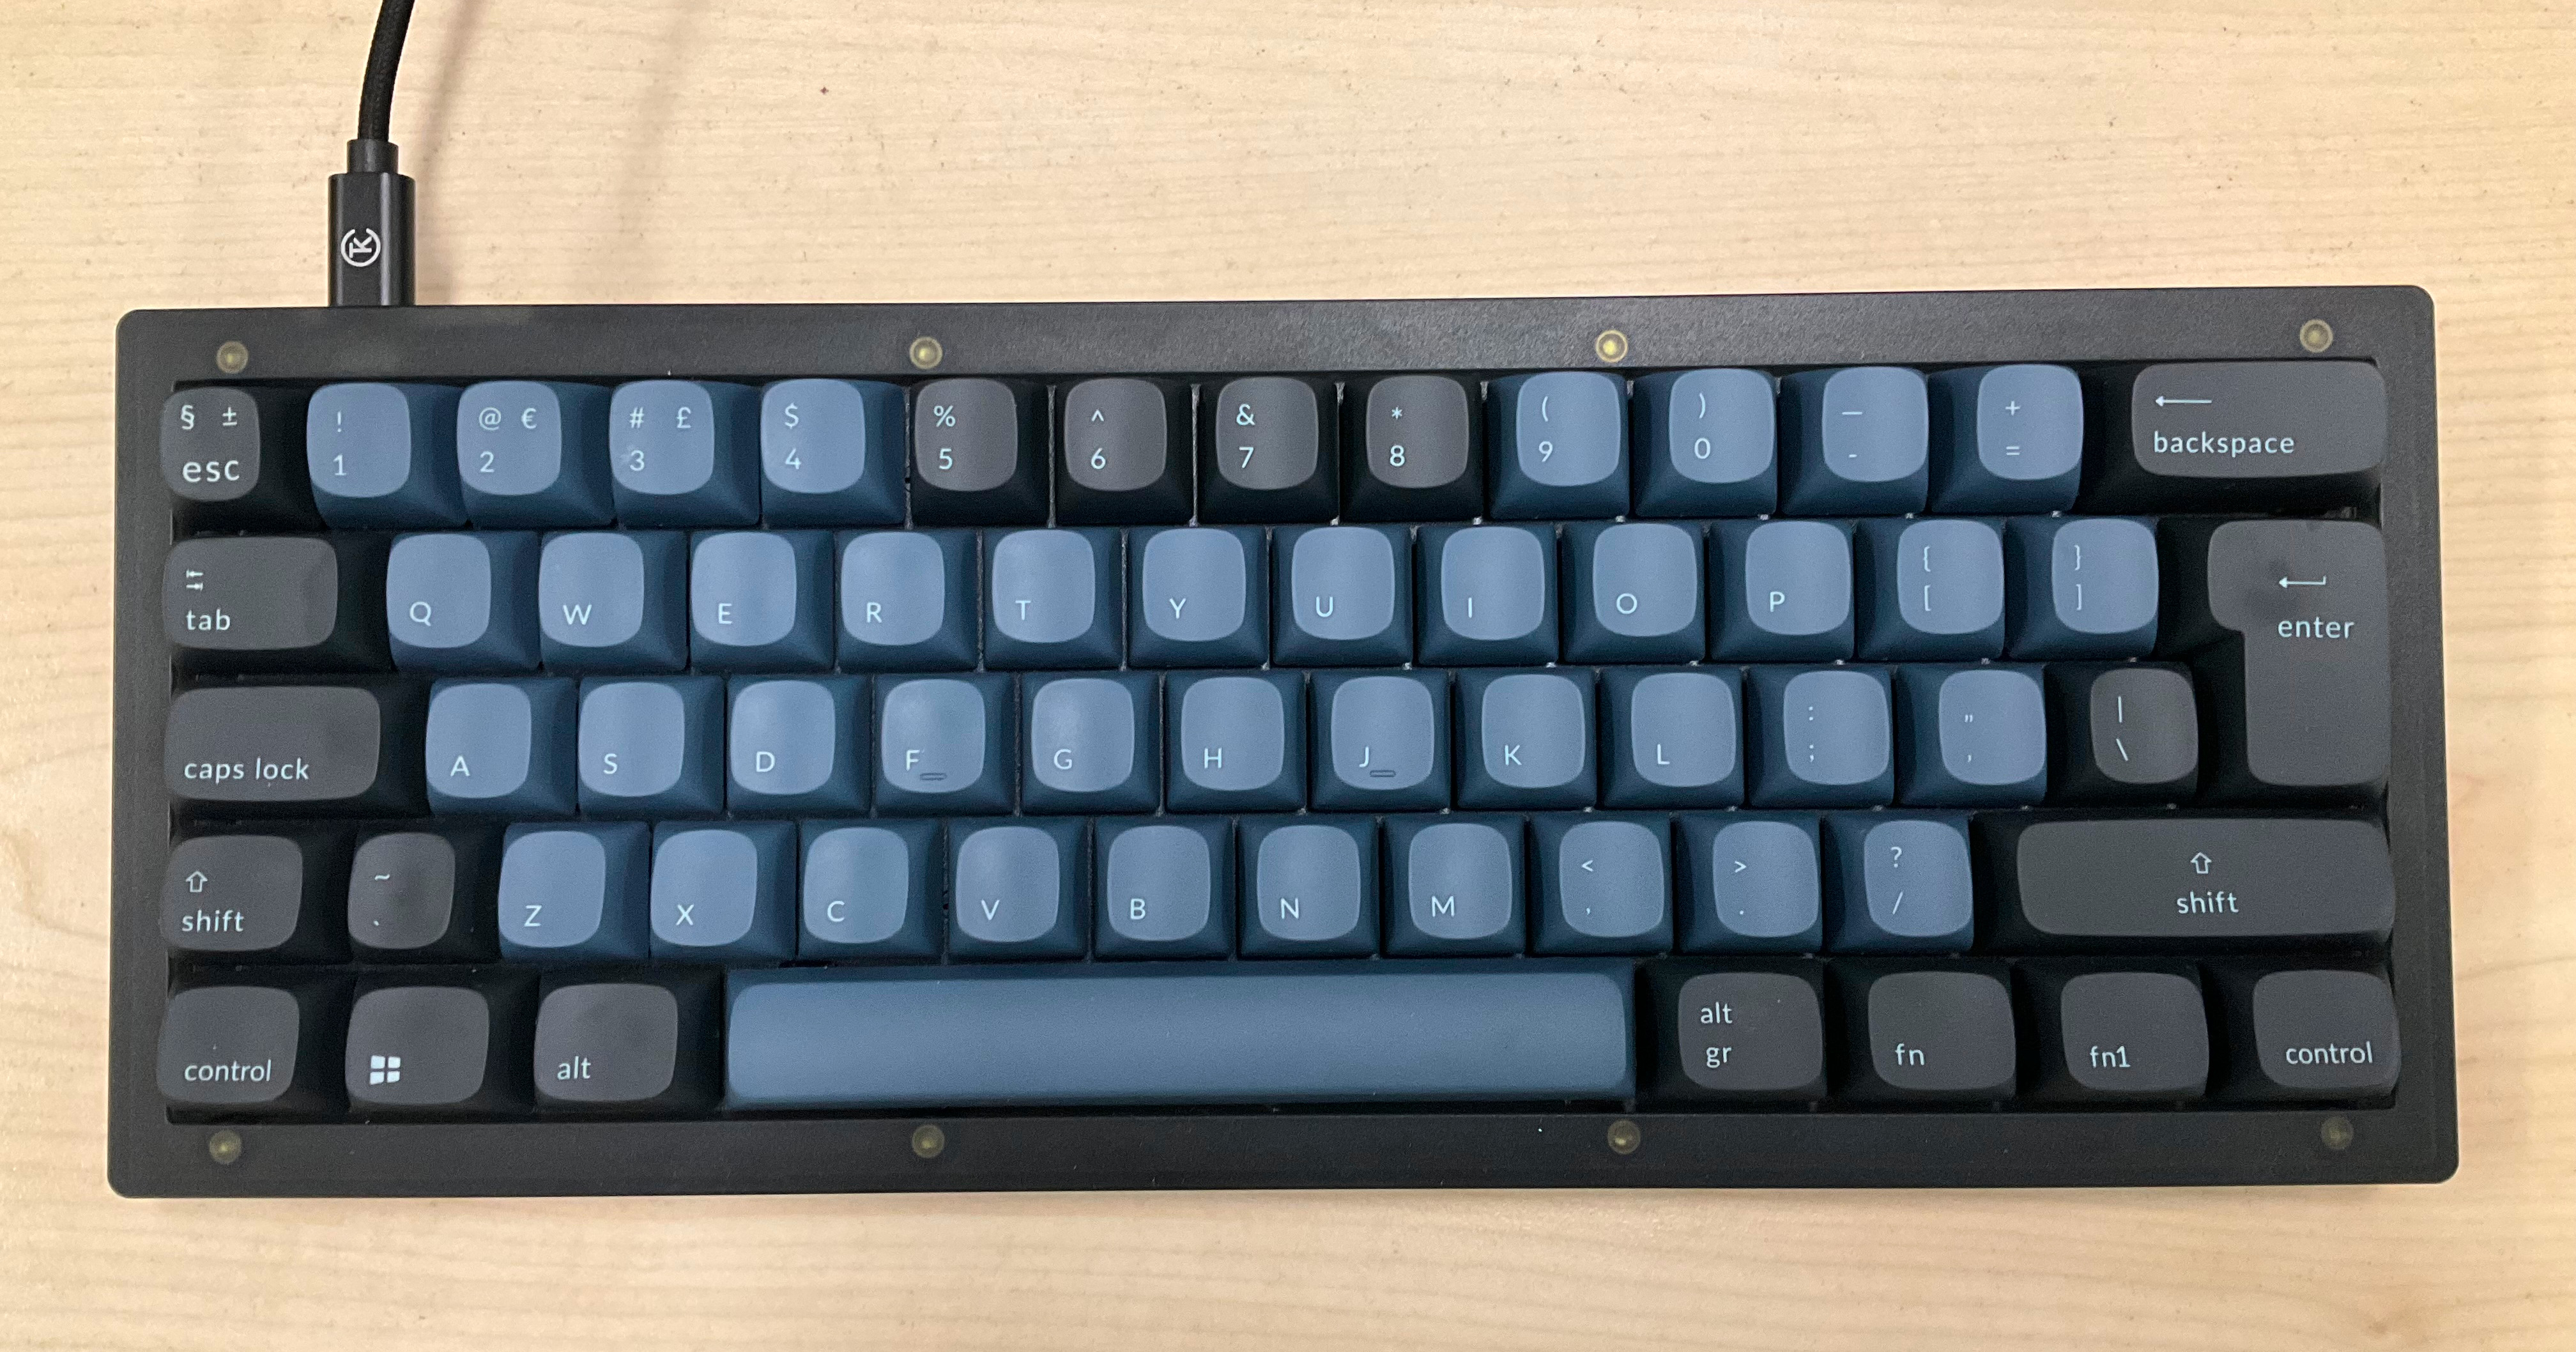
My Keychron V4 at the office
What led me to the Keychron V4
QMK
After I got my Glorious GMMK2 Pro, I learnt the following:
Retail keyboards were now available with switches that could be swapped out without soldering. This allowed me to choose from a number of different keyboard brands and models to find something that would work best for me.
The Open Source QMK or VIA was available on a number of keyboards which allowed:
keys that could customized without relying on any proprietary software.
this mapping could be done directly to the firmware so that it was not dependant on any mapping software on the OS.
QMK allowed for having multiple mapping layers which could be accessed from the base layer.
QMK allowed us to program how individual keys could be coloured using RGB.
QMK was a game changer for me. When I got the Vortex Racer 3, I was not aware of such an option. All future keyboards that I buy would have to be programmable via QMK.
Layout and cost
With that in mind, the pre-dominant options I had were either the keyboards from Glorious or Keychron. With my choice narrowed down to these brands, my next criteria was the keyboard layout. And one of the things on my wish list was to have the vertical ‘Enter’ key on the right side of the keyboard so that if my right hand was on the mouse, I could just extend my thumb to reach out to hit the ‘Enter’ key when needed. Looking through the different layouts available, the 60% keyboards did have the ‘Enter’ key on the rightmost side of the keyboard, but they didn’t have the row of functions keys at the top, which I needed. And there wasn’t a layout that had those two options - the ‘Enter’ key being one of the right most keys and having the row of function keys F1 to F10.
I had to be practical and come to a compromise. I felt I could do away with the need for the dedicated row of function keys. So that meant I should go with the 60% keyboard layout. It was the first time going with such a layout and I would have to adapt and see if it worked out for me. With the 60% layout, I had the option of going with the more common ANSI keyboard, which had a horizontal ‘Enter’ key or the European ISO keyboard which had the bigger ‘Enter’ key. I decided to go with the ISO layout, and that too, the UK-ISO layout, as it was closest to the ANSI layout which I was familiar with but with the big ‘Enter’ key. This further narrowed down my options to the Keychron V4 or Q4 keyboards.
I wanted to go with the Q4 as that was the better quality one. But, I had already spent about S$200 about a month back on the Glorious GMMK2 96%. And I had also spent S$95 on 108pc Zjmehty Kailh Box Deep-Sea Silent Whale Switches. The V4 was on sale. So, I decided to go with the cheaper V4 which I got for US$64. Since a pack of 110 of the Keychron Silent K Pro brown switches were only US$26, I got that as well. So I got both the V4 keyboard and the switches for US$103 including shipping.
My impressions of the V4
First of all, I’m very happy with the build quality of the V4. So much so that I don’t want to spend money on the higher end Keychron Q4. I don’t see any reason to upgrade this.
I love the build quality of the key caps, its ability to let the RGB light shine through, the feel of the keys and the little notches on the ‘F’ and ‘J’ keys to let you know that your fingers are on the home keys. I love the fact that the ‘Enter’ key is big and on the right and the fact that this ‘Enter’ key was what drove me to get the UK-ISO version.
The brown switches that came with the keyboard were tactile but not silent for me. So, I replaced the bigger more noisy keys with the Zjmehty Kaihl Box Deep-Sea Silent Whale switches and then replaced all the letter key switches as well. I replaced all the other less important keys such as the row of number keys, symbols, punctuations and 4 bottom right modifier keys with the cheaper Keychron Silent K Pro brown switches. Frankly speaking, I can’t really tell the different between the cheaper Keychron Silent Browns (US$26 for 100 numbers) and the more expensive Kaihl Deep-Sea Silent Whale switches (US$95 for 108 pieces).
The V4 is not as heavy as the Q4, which is great for me at the office since I’ll have to keep it away after each day with my hot-desking situation.
Remapping the keys
When I tried to remap the keys, I quickly realized that the QMK code compilation of way of getting the keyboard firmware wasn’t available for the K4. When I initially tried doing it with VIA using the Chromium browser on my Ubuntu desktop, it didn’t work. But soon, I figured, it was because the mapping on the higher layers were messing with my lower layers. Corrected that solved the issue.
Remapping the keys with VIA was certainly a lot easier than flashing the QMK firmware to the keyboard, as this involved removing the USB cable to power cycle the keyboard for the changes to take effect. I was very happy with this approach, except that I haven’t found a way to customize the RGB lighting like I could do with QMK firmware compilation. Nonetheless, the convenience of VIA was so much more than the QMK compilation method that it didn’t worry me too much. My basic requirement was to be able to do key remapping, which I could do with a visual interface using VIA. It was amazing how VIA would just load up the current key mapping and allow you to change the mapping instantly. I was impressed! And very happy with purchasing the V4 and replacing the keys out with the silent keys.
So happy and satisfied that this was the way to go, that on Tuesday, 5th March 2024, I ordered my 2nd V4 for the office for US$64 + $13 for shipping and got them on Tuesday, the 11th of March 2024.
Between the Keychron Silent switches and the Kaihl Box switches, I have more than enough switches for this new 2nd keyboard. I’ll get the switches replaced out before I go in to the office on Thursday, 13th March and Friday.
My Layers
Layer 0 is the Mac keyboard map, which I don’t use because I’ve set the hardware switch to Win, so let’s start with Layer 1.
Layer 1 - Base Layer

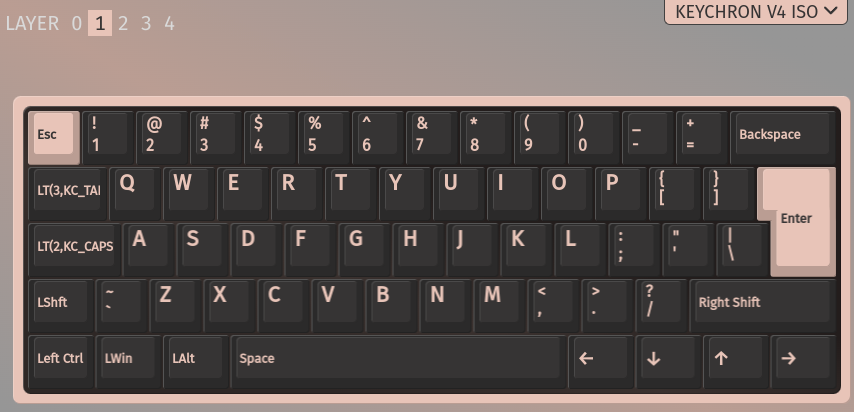
My Keychron V4 Layer 1 or Base Layer
The majority of the keys on my base layer have not been modified, except for these ones which are described below:
Caps Lock: With the LT(2,KC_CAPS), when the Caps Lock key is pressed without any other key, it works like a normal ‘Caps Lock’ key. But when it is held down and pressed with any other key, it activates Layer 2 for that key, if available. This is my work horse mapped ‘Function’ keys which are on Layer 2.
Tab: With LT(3,KC_TAB), similar to the Caps Lock key, when this is pressed on its own, it works like a normal ‘Tab’ key. Otherwise, held down, it activates Layer 3 for that key.
Bottom right four keys: I remapped these rarely used four keys in the right corner as the navigation keys as I hardly use these keys if my hands are on the home row.
Layer 2 - Function Layer

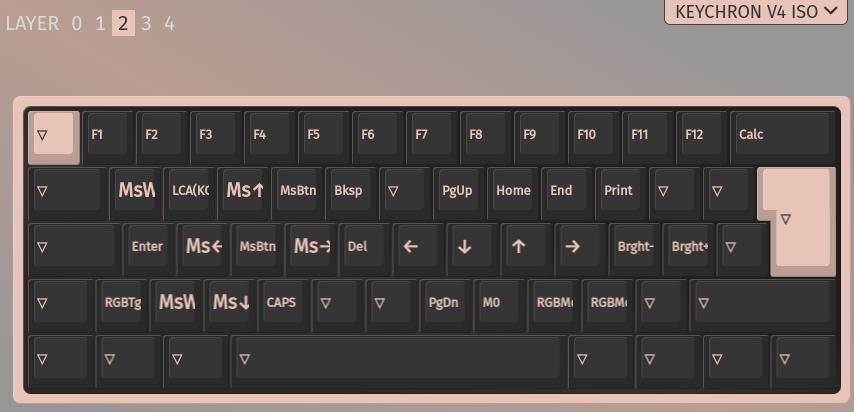
My Keychron V4 Layer 2 or Function Layer
This is where my most commonly used non-base layer keys reside and are described below:
Function keys F1 to F12: These are necessary as I do not have the dedicated function key row on the 60% keyboard.
Basic Navigation: These are the basic navigation keys copied from VIM, i.e. H = Left, J = Down, K = Up, L = Up.
Extended Navigation: These are the longer navigation keys mapped in the following manner: U = Page Up, N = Page Down, I = Home, O = End which are similar to the mapping I have on my Racer 3 keyboard.
Eraser keys: These are the ‘Delete’ and ‘Back Space’ keys which are useful to have on the left hand as these are used quite often when editing text.
Mouse Nav and Click: On the left hand, I have this set of mouse navigation keys when my left hand or both hands are on the keyboard and I’m lazy to reach out with my right hand to the mouse for small or quick mouse click / navigation without having to take my right hand away from my home keys.
Tasks: W displays all running tasks on Windows where LCA(KC_TAB) presses the Left Control-Alt-Tab keys just like it did on my Racer 3 keyboard.
Macro 0: My layer 2 ‘M’ key is mapped to the macro ‘App Menu’, ‘M’ key which I use in Microsoft Outlook to Move the currently selected email to a mail folder, which I use often to organise my email.
Left ‘Enter’ key: This is my left hand ‘Enter’ key for the times when my right hand is not on the home key such as when it is on the mouse which I use with my right hand.
RGB Toggle: This maps to my layer 2 ‘Z’ key to switch on RGB lighting at night when all the lights are other off and my wife is sleeping.
RGB Bright + / -: To increase or decrease the RGB lighting under the keys which are mapped to the ; and ‘ keys.
Layer 3 - Numeric Keypad

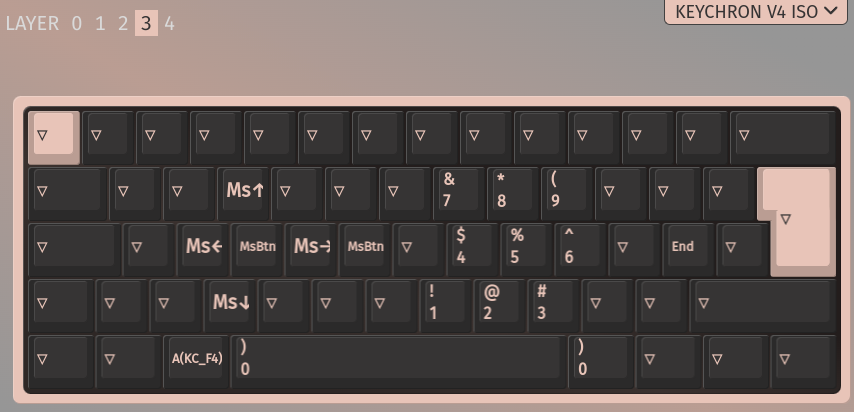
My Keychron V4 Layer 3 or Numeric Keypad Layer
I don’t really use this layer much and it is just here for convenience.
My right hand keys provide the numeric keypad while my left hand keys move the mouse around. The mouse navigation was later moved to Layer 2 as I did find it useful sometimes.
Application Quit key map
After using this 60% keyboard without the function key row, I came to realise that I pretty much only use two function keys; F2 for editing a cell in Microsoft Excel and F4 to close windows with Alt-F4 or less often, Ctrl-F4 to close the current window within an application. So, this meant that I would have to press ‘Fn-Alt-4’ to get the Alt-F4 function, i.e. 3 key presses, which I felt deserved a shortcut key to make key presses easier. Initially, I had moved this to Layer 2 with the ‘Fn-Alt’ key presses. But I soon realised that I do use Shift-Alt-Down keys which interferes with this mapping. Since, I was running out of available short cut keys on my left hand for Layer 2, I decided to move this to Layer 3, which made sense to move it to a completely different layer, since it would close the whole application. So better not have it on the common Layer 2. so that’s what I did. Layer 3 ‘Fn-Alt’ became my ‘Alt-F4’ function.